Of Basil and Parmesan

“I’ve never met a problem that cheese couldn’t solve…”

I have a great love affair with cheese, I didn’t always, though. As a kid, I hated it, I would only eat it on pizza, period. No mac and cheese, no cheeseburgers, nothing. I didn’t know then the delicious potentials of cheese, of truffle cheese and brie, Parmesan and smoked Gouda. My mouth is watering while typing this, so let me stop.

The good thing about cheese is that many of them are low in carbs and high in fats, which means they’re acceptable on the Keto diet! My favorite cheese is fresh Mozzarella, but a close second is Parmesan. With its bold flavor and crisp texture, Parm is one of the more versatile cheeses, and I like to throw it in a BUNCH of dishes I make, just to add a little oomph. I’ve been meaning to make homemade Parmesan crisps in the oven for snacking, but I haven’t had the time. Maybe in the future… I’ll let y’all know how it goes.

This week’s recipe is less about the cheese as a solo act, and more about what it brings to the table in a recipe. There’s all kinds of stuff you can make with some good Parm, its melody harmonizes well with so many flavors, but this week, we’re focusing on herbs. Specifically, basil. If you haven’t figured it out yet, I’ll go ahead and reveal the recipe for this week:

Spinach Basil Pesto

It’s a simple recipe, and common this time of year. As a matter of fact, I recently watched a video on five different things to do with Basil that said to me, “Think outside the Pesto.” But I don’t want to.

I was first introduced to this delicious sauce-spread after college, actually. That’s right, I went almost 19 years never having enjoyed this sweet-savoriness of garlic and basil. Don’t cry for me, I ate very well up until that point, but when I tasted it for the first time, in a chicken farfalle pasta with blistered grape tomatoes, I definitely had the feeling of where-has-this-been-all-my-life. I had to have it. I must’ve eaten it once a week for about 3 weeks before we ran out of our supply. Man, did I miss it afterwards.

The first time I tried my hand at this recipe was about 4 years ago. Since then, I have made many substitutions and additions, playing with the recipe and learning new things. Somehow, though, I always come back to this one, the one that was taught to me by one of the greatest influences on my culinary life, my Nanny Cathy. (For all you non-southerners out there, Nanny is just a south Louisiana term for godmother. Don’t get excited.)

This recipe has seen a LOT of trial and error, so I would advise some caution. Do me, and yourself, a huge favor and follow this recipe first, to the letter, and then play with the ingredients. Not that it’s hard, don’t get me wrong, just that it’s a lot of bold flavors, and you don’t want to make an overpowering pesto. I have seen many a food video that adds pesto to cream sauces, and I’m always left wondering “why?” If you mix the right blend of ingredients the right way, pesto is beautiful enough by itself. I also like adding it to other recipes for flavor, like a spoonful to my marinara sauce for depth, or a light smear on some crusty bread when I’m making homemade bruschetta, but sometimes I will just dip some pretzel chips into it by itself. Yeah, it’s that good.

I issued a challenge to our Facebook followers that if we were to get 50 likes on our page, I would put out a bonus recipe this week. Unfortunately we were a little short. BUT, fortunately we gained five new followers to the website! Soooo, that’s something to CELEBRATE!!!! I’ll cave and you will see a SECOND post up today! Without further ado, let’s get jiggy with it. Too much? Ok, let’s get started.


Spinach Basil Pesto

  • Servings: about 2 cups
  • Difficulty: very easy
  • Print


Credit: Nanny Cathy

Ingredients

  • 1/2 cup fresh basil leaves
  • 1/2 cup fresh spinach
  • 1-2 garlic cloves depending on size (note: Start on the low end, and add more if the flavor is not strong enough. You can always add more garlic, but you can’t take it away)
  • 1/4 cup of grated or shredded parmesan, depending on your texture preference
  • 1/8 cup of pine nuts (I have also seen walnuts, pistachios, and almonds…. do you boo boo)
  • Juice of 1/2 a lemon (or a few splashes from the bottle)
  • Olive Oil
  • Salt and Pepper

Directions

  1. Add your basil, spinach, garlic, pine nuts, and parm to a food processor or blender. If using a blender also add lemon juice and 1 tbsp of olive oil, just to get some liquid in there too. Pulse until well chopped and season with salt and pepper.
  2. Turn your blender/food processor on to a low/medium speed and SLOWLY drizzle in olive oil until the mixture is smooth
  3. Store in a sealed jar in the fridge for up to 2 weeks, or on the freezer for a few months. When thawing DO NOT MICROWAVE. Set on the counter until thawed or in frige if you are leaving the house.

A final note on this recipe is to let your pesto sit. Yes, you can serve immediately, but I  have found that it taste’s so much more flavorful if you let it sit for about 24 hours and…. marinate? I don’t know how to describe it. My favorite way to eat it? Drizzled over sauteed shrimp and fresh cauliflower mash. Keto YUM!!!

Until next time,

Em

Of Cilantro and Vinegar

“Don’t give me no rotten tomato, ’cause all I ever wanted was your sweet potato.” – Sarah Dessen.

When I started this journey into cleaner eating I missed carbs. I was raised a Cajun girl, and anyone from South Louisiana knows, we put everything over rice. As the generations have passed, newer generations of Cajuns got away from rice, and got with the times, turning to pasta, and by the time I was living on my own, almost all of my meals were over pasta or rice, and with almost no veggie sides. So yeah, I was dependent on them, but more than that, I loved them. I was in love with carbs, I had a relationship with carbs, and not just pasta and rice, but bread and tortillas and cereal and grits and corn and beans and… you get the picture.

Anyway, it was really hard, and when we originally started the keto stuff, I was in misery. My body was detoxing from carbs, and like any detox there were side effects. By day 3 it was supposed to get better, and it wasn’t, so I started to look into recipes that were still incorporating carbs, but carbs that were better for you. And just like that, I found sweet potatoes.

Anyone like me has eaten sweet potatoes in only 2 instances, in pie, and in casserole, both at Thanksgiving. These sweet potato recipes are not going to kill you, but they definitely don’t fall into the clean eating category, due to the sugar we add to make them palatable. But, I learned something on this food journey, sweet potatoes… don’t have to be sweet.

Yes, it’s true, you can have a delicious baked sweet potato and add meats, and chives, and butter, and all kinds of delicious savory toppings, and it will still taste good! So, without further ado here’s this week’s recipe reveal:

Beef Stuffed Sweet Potatoes with Carrot Slaw

Beef. Stuffed. Sweet Potatoes. with Carrot Slaw…

This was another recipe my husband found online, so I can’t take any credit for this delicious dish. What I can take credit for is making a few adjustments for taste and texture’s sake.

When I make this recipe, I use my magic cauldron for my sweet potatoes. That’s right, I’m talkin’ an Instant Pot. O.M.G. do I love this thing. If you don’t know what an Instant Pot is, calm down, this isn’t that kind of food blog. It’s a programmable pressure cooker that works miracles. I can steam a sweet potato to perfection in a total time of 30 minutes or less. Ok, so that’s not instant, but I didn’t name the thing, I just use it. All the time. The recipe below uses the oven to cook the potatoes, because that’s the way the recipe I found does it, and most people don’t have a programmable pressure cooker from the gods, but if you have one and want to use your Instant Pot for this recipe, I’ll tell you what to do.

Clean, Set, Forget. That’s pretty much it. Oh, you want directions? Ok, I’ll oblige. Clean the sweet potatoes well, scrubbing the skin to get any packed in dirt in the crevices. Place the steamer trivet, the one that came with the pot works well, in the instant pot, and add about a cup to a cup and a half of water. (Psst, for added flavor, you can add fresh herbs to this water). Set manual mode, or pressure cook mode, on high pressure for 15 minutes, make sure the sealing valve is set to sealing, and just walk away. Allow the pressure to release for about 10 minutes before quick releasing it. This just means leave it alone for 10 minutes after cooking, and then set your sealing valve to venting, and let it vent until there’s no more steam. Then you can open the pot, and your potatoes should be perfect.

Now that I’ve catered to my IP peeps, let’s get down to the recipe.


Beef Stuffed Sweet Potatoes with Carrot Slaw

  • Servings: 4
  • Difficulty: Medium
  • Print

Credit: foodnetwork.com

Ingredients

  • 4 small to medium sweet potatoes, scrubbed
  • 2 tbsp of Extra Virgin Olive Oil
  • 1 cup of shredded carrots, divided
  • 1/2 bunch of cilantro, chopped finely, divided
  • 1 tomato (2 if using Roma tomatoes), chopped
  • 1/2 medium onion, chopped
  • 2 cloves fresh garlic
  • 2 tbsp and a tsp red wine vinegar, divided
  • 1 tsp ground cumin
  • Kosher salt
  • 1/2 tsp dried oregano
  • 1 tsp cayenne pepper
  • Ground black pepper
  • 1 lb lean ground beef or turkey

Directions

  1. Preheat oven to 400 degrees.
  2. Poke you sweet potatoes about 4-6 times with a fork, making sure to poke all around the potato, this will help keep them crispy and not explode in the oven. Season with salt and olive oil, wrap in foil, and place in preheated oven for about 45 minutes or until fork tender. Set aside and keep warm
  3. In a medium bowl, combine half of your shredded carrots, about half of your chopped cilantro, the 1 tsp of red wine vinegar, and 1/4 tsp of salt, toss and set aside to marinate.
  4. In a food processor, combine remaining carrots, tomato, garlic, onion, red wine vinegar, cumin, oregano, cayenne, 1/4 tsp of salt and pepper, and pulse until smooth.
  5. Brown meat in a medium skillet over medium high heat in a little bit of olive oil, and season to your taste with salt and pepper. Drain and set into a large mixing bowl.
  6. Add your pulsed veggies to the skillet and cook down until the liquid has cooked out, about 5-10 minutes.
  7. While your veggies are cooking, slice your sweet potatoes in half long ways, and scoop out the soft insides into your bowl with the sauteed ground meat, and season with a little salt and pepper. You want to leave a little in the skin to give it some integrity, but not so much that you can’t fit in your stuffing. About 1/4 inch on each side is good.
  8. Mix in your cooked down veggies with your beef and sweet potato, and fold all ingredients together until well combined. Garnish with cilantro, and serve with your slightly pickled carrots (the ones we set aside for later)

Ok, so this isn’t one of the simplest recipes, but I guarantee you the payoff is so worth it. What you get is this beautiful blend of creamy potato with firm ground beef, and a delightful little crunch with the carrots. It’s complex and light on the stomach, so while you feel full, it doesn’t bog you down all day. When I make these, my husband will take the leftovers to work, and his coworkers rave about them.

If you liked this recipe, please give us a like and share on your social medias, and if you didn’t please give me a comment and tell me why! Also, if you made this recipe, send me photos our Facebook page via messenger. I’d love to see what you can create.

Of Cream Cheese and Bacon

“These are a few of my favorite things…”

So when asking my best friend what her favorite foods are, she’ll tell you two things. Cheese and Bacon. There may be variants of these depending on the day, but it all comes back to cheese and bacon. So, when I explained to her that my husband and I were doing the Keto diet, she was hesitant as to whether or not it was healthy, but excited. Because Keto includes her favorite foods, high in fats and low in carbs. In other words: Bacon and cheese.

Don’t get me wrong, Keto is not just bacon and cheese. In its whole, the keto diet is about finding a balance of fats and protein while minimizing carb intake. I could go into the whys and how’s of it all, but this isn’t a fitness blog. It’s a food blog, so let’s get to the good stuff.

My husband actually found this recipe on someone else’s website, but I’ve put a little Cajun Girl twist on it, so I wanted to share how I made these delicious dream boats. It’s time for the reveal:

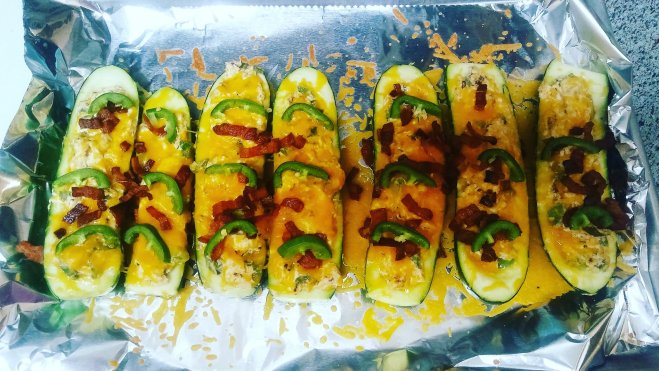
Bacon Jalapeño Popper Stuffed Zucchini Boats

You read that right. Bacon. Jalapeño. Popper. Stuffed. Zucchini?

OK, so I know there’s a vegetable in there for all you meat eaters and picky eaters like me, but Zucchini isn’t actually that bad, if you cook it right. Done well, it can have the most deliciously crisp yet tender texture of any squash I’ve had. The key is in the prep.

The first thing you always want to do when creating a recipe like this is get everything cut and ready for the skillet. Chefs call this mise en place, it’s just a fancy way to say getting set up. If you’re busy and impatient like me, here’s a tip: cut up the vegetables/proteins in the order in which you’re going to cook/season them. For example, if your mushrooms need to sit in a marinade for 10 minutes, cut them first, and then move on to your proteins, and veggies in the order you’re going to cook them. This way, you can prep while you cook/marinate. It might not actually save any time, but I always feel more productive this way.

In this recipe, I would recommend cutting your zucchini first. For this recipe, we slice long ways, but if you have an apple corer and a sense of adventure you can slice it in half the other way. Slice your zucchini, and then season the inside LIBERALLY with a tablespoon or so of salt. Then place your veggies salted side up, and set aside for about 5-7 minutes. What this does is it draws out the moisture held in the zucchini, which will help it from getting excessively mushy in the cooking process. When the time has passed, take a dry paper towel and dab the moisture away from the zucchini. Let sit for another 5 or so minutes while you slice the remaining ingredients. Repeat the dabbing process, and you should be good. If when you’re cooking your bacon or other veggies, you notice more water rise to the top of the zucchini, you can always dab it away. I would try to get the zucchini as dry as you can, it’ll really make a difference.

Fats are a huge part of Keto, and using as many parts of the animal is a large part of my culture as a Cajun, so in this recipe I fried everything in bacon fat. Could I have used avocado oil or something lighter? Sure, but I don’t for two reasons: one, bacon fat is delicious, and two, it’s a by product of the ingredients I am already using in the recipe, so this way is less wasteful. You don’t need all of it though. What I did was pour my rendered fat into a ceramic mug, and then while it was still warm, use it as needed to cook my remaining veggies and aromatics. Whatever I don’t use, I’ll dispose of safely. SAFELY!!! Don’t, don’t, DON’T Pour hot grease or oil down the drain.

Enough yakking, let’s get to it!


Bacon Jalapeño Popper Stuffed Zucchini Boats

  • Servings: 4
  • Difficulty: easy
  • Print


Credit: delish.com

Ingredients

  • 4 Large fresh zucchini, sliced in half (see above)
  • 6-8 Slices of thick-cut bacon, sliced into 1/2 to 1/4 in. bacon bits
  • 3 Cloves garlic, minced
  • 4 Fresh Jalapenos, 3 diced and one sliced for garnish
  • 1 Block of cream cheese, softened (I used Greek cream cheese this time around)
  • 2 Cups shredded cheddar cheese, divided (I prefer sharp cheddar)

Directions

  1. Preheat oven to 350 degrees.
  2. In a skillet on medium heat, cook bacon to desired crispyness. Remove from pan and place onto a plate lined with a few paper towels, to absorb the excess grease and keep it crispy. Reserve bacon fat.
  3. Add 1-2 tbsp of fat to the skillet, and add in you garlic. Cook for about 2 minutes, and add the diced jalapeno. Cook for about 2-4 minutes or until Jalapenos are soft.
  4. Mix together 1 1/2 cups of the cheddar, cream cheese, cooked jalapenos and garlic, and about 1/2 to 3/4 of the cooked bacon bits, until well mixed through. You can use a hand mixer, but I prefer to use a spatula and just fold the ingredients together so I don’t mess with the melding of textures.
  5. Scoop out the seeds of the zucchini, leaving about 1/4 inch of insides on the sides and bottom of the zucchini, think like a twice baked potato.
  6. Stuff the zucchini wells with the cheese mixture, evenly distributing it among all the zucchini. Place all stuffed zucchini on a cookie sheet lined with foil or parchment paper. Sprinkle remaining cheddar over the stuffed zucchini, then top with remaining bacon, and slices of Jalapeno
  7. Bake in the oven for about 15 minutes, or until cheese on top has melted, and the zucchini are somewhat tender. Allow to cool for 5 minutes and serve!

If you liked this recipe, please give us a like and share on your social medias, and if you didn’t please give me a comment and tell me why! Also, if you made this recipe, send me photos to the email address on the Contact Us page. I’d love to see what you can create.

Until next time,

Em